1. Easter Bunny Cake recipe (1950)
A feather in your Easter bonnet — this luscious Easter bunny cake… Best cake you’ve baked in a month of Easter Sundays… and you… yes, you… can take all the glory!
Ingredients
1/2 cup Dexo (shortening)
2-1/4 cups sifted cake flour
3 teaspoons double-action baking powder
1 teaspoon salt
1% cups sugar
1 cup milk
1 teaspoon vanilla
2 eggs, unbeaten
Directions
Measure shortening into bowl. Sift dry ingredients onto shortening. Add vanilla to milk. Add 2/3 of the milk.
Blend and beat 1 minute (count at least 150 strokes per minute). Add remaining 1/3 milk. Add eggs. Beat 2 minutes.
Bake in two greased and floured deep 8-inch layer pans in moderate oven, 375° F for 25 to 30 minutes.
When cool, frost with butter frosting. Color coconut green, using vegetable coloring. Place on top of cake.
Arrange Easter candy bunny on coconut. Decorate with colored jelly beans.

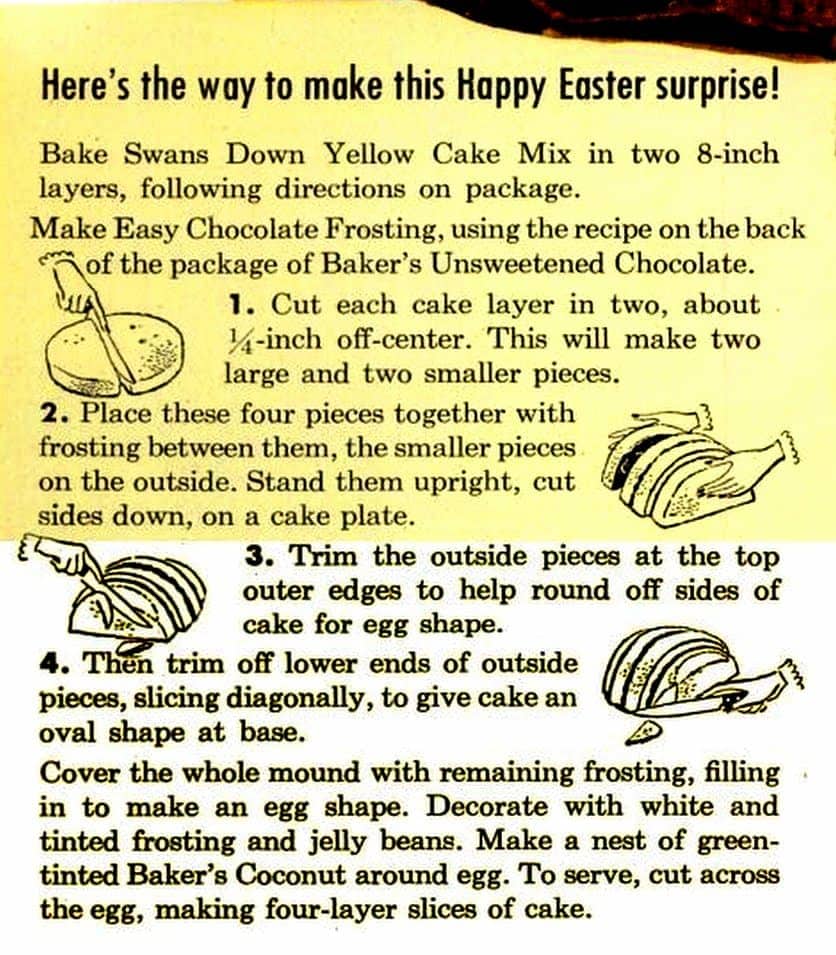
2. Here’s the way to make this Happy Easter surprise! (1953)
Quick, like a bunny — make this gay Easter egg cake — with Baker’s Chocolate & Swans Down Yellow Cake Mix!
Bake Swan’s Down Yellow Cake Mix in two 8-inch layers, following directions on package. Make Easy Chocolate Frosting, using the recipe on the back of the blue and yellow package of Baker’s Unsweetened Chocolate.
1. Cut each cake layer in two, about 1/4-inch off-center. This will make two large and two smaller pieces.
2. Place these four pieces together with frosting between them, the smaller pieces on the outside. Stand them upright, cut sides down, on a cake plate.
3. Trim the outside pieces at the top outer edges to help round off sides of cake for egg shape.
4. Then trim off lower ends of outside pieces, slicing diagonally, to give cake an oval shape at base.
Cover the whole mound with remaining frosting, filling in to make an egg shape. Decorate with white and tinted frosting and jelly beans. Make a nest of green-tinted Baker’s Coconut around egg. To serve, cut across the egg, making four-layer slices of cake.
MORE: Make a cute marshmallow bunny birthday cake (1941)

Directions and diagram to make this cute Easter egg cake

3. The Easter Egg Cake and how to hatch it (1969)
Using 1 box of cake mix, bake an 8-inch and a 9-inch layer cake. Cool.
Cut 9-inch layer as shown in diagram A and 8-inch layer as shown in diagram B.
Split 2 ring sections from diagram B. Arrange pieces as shown in diagram C, placing split ring sections above and below smaller zigzag piece.
Next, make 4-1/2 cups (2-egg white) Seven Minute Frosting; secure cake pieces with frosting.
Tint 3 cups frosting pink with red food coloring; frost egg portion of cake. Frost rest of cake with remaining frosting.
Now, using 1 package (7 oz.) Baker’s Angel Flake Coconut and food coloring, tint 1/2 cup coconut yellow, 1/3 cup coconut pink, and 1 cup coconut green.
Sprinkle yellow coconut over neck, head, and beak. Make a diamond pattern across egg with pink coconut. Sprinkle green coconut over nest, and remaining white coconut around diamonds.
Decorate to taste using licorice strings and jelly beans.

Easter cake diagram/template

4. Vintage Easter bunny shaped cake (1964)


