In America, folk art painting was especially popular from the 18th century through the mid-20th century. Influences came from immigrants who brought their own traditions, especially in places like Pennsylvania, where German settlers contributed the colorful, geometric designs known today as Pennsylvania Dutch. These often included motifs like hearts, tulips, birds, and symmetrical borders. Unlike formal fine art, these painted decorations had a purpose — they adorned furniture, walls, wagons and household tools, often blending design with function.

By the 1940s and ’50s, folk art painting saw a revival thanks in part to artists like Peter Hunt. He developed a playful, modern take on peasant-style painting that encouraged home decorators to try their hand at it, even without formal training. His method centered on using a simple teardrop-shaped brushstroke — what he called the “basic stroke” — to build up full scenes or motifs. With practice, hobbyists could decorate an old dresser or wooden box with flowers, vines, or quaint figures using just a couple of brushes and some paint.
What made folk art painting especially appealing was how adaptable and personal it could be. Artists often added initials, short sayings, or details from their own lives into the designs. Hunt, for example, would sometimes paint folk-style stories onto chests or boxes, using the same brush techniques he taught beginners. These decorative flourishes gave a handmade touch to everyday items, turning furniture into keepsakes.

Below, we’ve pulled together a collection of mid-century tutorials and photos that show exactly how people learned to create these designs using nothing more than a brush and a bit of paint. The following instructions and illustrations — along with specific tips for decorative paintwork and antiquing old furniture in a separate article — come from books and brochures originally published in the middle of the twentieth century.
Here’s how you can begin to make your own beautiful folk-art painted designs using simple brushstrokes.
Note: The brand of paint they used in the 1940s — DUCO, referenced several times throughout this article — is no longer available.
After consulting with an artist, we learned that a product like Majic Paints Diamond Hard Acrylic Enamel High Gloss Paint (see it here) may work as a modern-day substitute, based on things like durability, suitable surface types, colors available, and its gloss finish.
You may want to talk to someone knowledgeable at a hardware or paint store in your area to get their suggestions and see what colors are available.
The change of paint brings with it a couple of benefits that people back in the forties didn’t have: By using acrylic paint, you avoid the original old-fashioned nitrocellulose solvent-based paint’s volatile organic compounds (VOCs), the vapors of which are strong-smelling and not healthy to breathe.
As a bonus, you can use water instead of paint thinner or turpentine to clean up acrylics, making the whole process a lot simpler. (Definitely do not use a solvent with water-based acrylic paints — and be sure to ignore any suggestions in the original text below calling for turpentine.)
Vintage folk art painting DIY: How to make folk-art furniture designs & patterns
From “Transformagic – Color: Likable and Livable,” by DuPont paint (c1955) & Peter Hunt’s Workbook (c1945)
If you can make this mark with a brush, you can make hand-painted decorations.
The “basic stroke”
Even the most complicated decorations are logical, step-by-step applications of single strokes of the brush.
This stroke is a special one, made in the same fundamental way each time. It is called the “basic stroke.” This simple mark is the key that unlocks the secret of “Transformagic” designs.
Actually, there is no magic in making the basic stroke — no more magic, at least, than you need to write your name.
After you have learned to make the basic strokes, you will combine them, thus forming primary designs. Then, you can arrange the primary designs, one with another, to create the complete Peter Hunt decoration. But, the first step is the basic stroke.
 The stroke makes a mark the shape of a teardrop; heavy at one end, trailing off to a thin line.
Most beginners find it easier to start the stroke at the heavy end by bearing down on the brush. As the brush is drawn across the surface, it is lifted so that, at the end of the stroke, only the fine point touches. After you have had practice, you can start at either end.
To make a clean, well-defined mark you must use the right kind of brush. A watercolor brush is what you want. This type has very soft, flexible bristles that form a point.
Two brushes are enough for almost any decoration; one with bristles 3/4 of an inch long, and the other 3/8 of an inch. Practice the basic stroke until you’re able to use the brush in a smooth sweep.
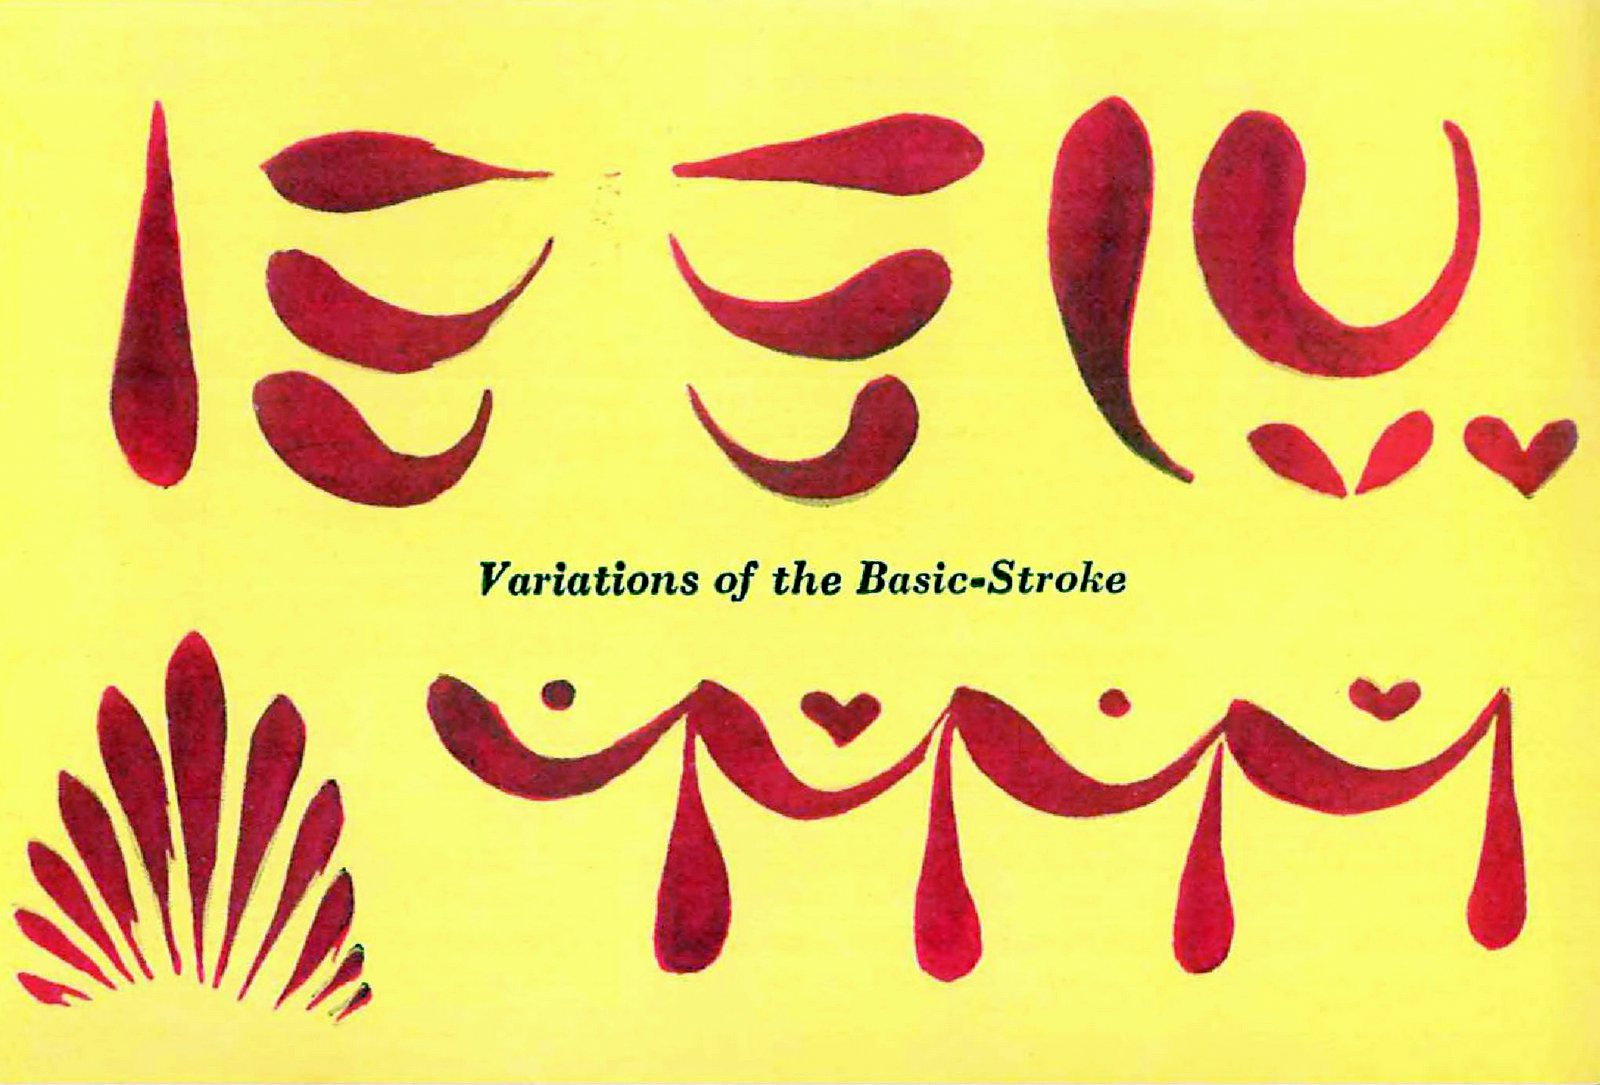
Variations of the basic-stroke
The basic stroke is not always made in a straight line. Its variations are many. It can be made in graceful curves or even in a complete circle. It is often short and thick or very long and thin.
Regardless of which variation you make, remember that it is the basic stroke, made with a tear-drop shape by using different pressure on the brush.
Before you start making designs, practice all the variations shown below. This practice will give you a confidence which shows up in the design. For a surface on which to practice use an old newspaper or a magazine.

Vintage folk-art paint for old furniture: How-to and tips
Peter Hunt starts by taking the old finish off a chest with a scraper and Du Pont Paint & Varnish Remover.

The chest is sandpapered, and given a coat of ‘Ovalite’ Enamel Undercoat and ‘Duco’ Gloss Enamel. Then decoration is applied.
Using the basic stroke and variations, on color is applied at a time and allowed to dry thoroughly before the next color goes on.

Finishing touches are added to complete a delightful decoration of birds, hearts and flowers. Result: a unique conversation piece… a future heirloom.

Combing basic strokes into primary Pennsylvania Dutch-style designs
Panel No. 1 — If you are one of those folks who like to say, “Why, I can’t even draw a straight line!” — well, make a crooked line!
A crooked line is much more interesting and makes a better border for your transformations… Angular decorative stripes are made by joining together short, straight strokes.
Short curved strokes joined together make the serpentine border. Both these patterns are used frequently on Peter Hunt transformations.
Panel No. 2 — You can make these borders still more interesting. Paint dots above and below angular borders. Use hearts with the serpentine design.

You’re not limited; you can mix the dots with hearts on either border for pleasing effects… A ribbon-like border is very attractive on some pieces.
You get the ribbon-like quality by using the brush much in the same way as you do when you make the basic stroke. You alternately bear down and lift up with your brush as you paint the curves.
ALSO SEE: Glam 1940s interior design: 5 before & after bedroom makeovers, plus 5 more retro room renovations
Panel No. 3 — Individualize your creations with sentiments, mottoes, initials, and dates. Write your message [in cursive] instead of printing it. Writing is easier and can be just as attractive…
Gay sayings on a transformation are often used. For example, on a wood box, Peter wrote: “He who chops his own wood warms himself twice.”
Foreign languages are intriguing: “A votre sante!” (“To your health!”); “Rien n’est beau que la verite” (“Nothing is as beautiful as truth”). Or, sign the piece with your name and show the year.

Panel No.4 — The European peasant paints on his furniture interesting incidents from his own life or from folk-tales and fables. Peter Hunt does the same thing. Let your imagination run! Use your sense of humor!
This “air mail — special delivery” is part of a complete decoration which told a story. Note how simply the body is made and how basic strokes form the feathers, beak, and eve. Keep your designs simple.
Panel No. 5 — Trees are easy to paint, too. Here is how Peter paints this one:
- A Nassau Green or Powder Blue oval outlined with basic strokes and then filled in.
- A vertical stroke of Hunter Green for the trunk.
- Basic strokes of the same shade for branches.
- Short basic strokes of Hunter Green tinted with White were combined to make leaves…
To finish, dots were placed between the branches and a border design for the ground. Don’t try to make trees look like they actually are in nature.
Panel No. 6 — The ivy vine makes a distinguished motif. It, too, is made from basic strokes. First, you paint a Hunter Green crooked stem. The leaves go on next in a lighter tint of Hunter Green made by adding a trace of White to green.
Each leaf is built from a combination of basic strokes as illustrated. Then add small stems and tendrils using the same green as the main stem. On our transformation, you can let the vine “climb.”

Combining basic strokes into primary designs, Part 2
Panel No. 1 — The rose is a primary design you can use on many pieces. The first step is the large pink dot (White tinted with Rich Red) shown on the left. The petals go on next by applying basic strokes of pure Rich Red.
The next color, blue, is the stem and a miniature heart for the flower’s pistil. The last step is the leaves, which are gracefully curved basic strokes, and two strokes for the blossom’s stamens.
ALSO SEE: Shades of the past: Authentic Victorian house paint color sample cards
Panel No. 2 — Bell-shaped blossoms are handled slightly differently. The petals are two strokes combined so that the blossom is head-down or standing pert and straight. Like the rose design, this stem is made with a sweeping stroke, heavy at the bottom instead of at the top.
Hearts and small combinations of strokes, painted in still another color, complete this primary design. Flowers may be used on furniture for almost any room.
Panel No. 3 — Now let’s use the rose and the bluebell designs to make a decoration. A heart is the center. Notice how this rather large color mass is broken up for interest by placing hearts within hearts in different tints and colors.
This complete decoration is only one of hundreds of combinations you can use. There is more information on the next pages on how to combine primary designs into complete decorations.

Panel No. 4 — Bunches of grapes are very decorative and as easy to make as the rose or bluebell.
A solid-color “egg,” standing on its point, is the framework for this design. With a contrasting color, the outline of each grape is superimposed over this background after it has dried.
Notice each grape is a circular basic-stroke. The stem and leaf are painted very freely, and this primary design is complete with Primrose Yellow dots as highlights.
Panel No. 5 — For primary designs, you can use almost anything for your inspiration. Carrots, radishes, stuffed olives, pears, strawberries, and fish are only a few objects which can be adapted.
When you select an object for a primary design, strip it down to its bare essentials rather than attempt to paint it as you actually see it. Merely suggest the details. Only a few lines show that this fish has scales or fins.
Diagram panels 1 through 5 (from above)

Panel No. 6 — The human form in design gives the decoration an added “boost.” Most people are much more interested in animated objects than they are in fruits and vegetables alone.
Peter Hunt’s figures are charming. They are made exactly in the same way the flowers and fruit are put together…
See how this quaint figure is built with a brush? It is made with three shapes; a large dot for the head, a few strokes for the body, and a regular mass for the skirt. Notice how the ruffle is the same pattern as the hair.
Panel No. 7 — Would you ever believe that this little figure could be made so easily? A circle for the head — a heart for the body — a generous skirt and she’s nearly completed…
In all primary designs, paint the large masses first. Add the details later. By doing so you will almost automatically scale your design to the area being decorated.
You will be able to see clearly the proportion the completed figure will have with relation to your working area.

Panel No. 8 — It’s the same story all over again — the same basic strokes and elements, but arranged in a different way. This new figure has a jacket made from combining two jackets of the profile figure. An inverted heart is the trousers…
Color is important when you make primary designs. Don’t be afraid of brilliant color! DUCO colors can be mixed with one another to make other lovely shades. Peter does this quite often and also adds White or Undercoat to the colors if he wants a light tint.
Panel No. 9 —“The sky’s the limit” for inspirations. Peter Hunt’s little angels are favorites with everyone. He uses them quite frequently, especially for pieces for the child’s room…
Make the head first, then the full-length skirt. Curved basic strokes are the arms. The wings are made by overlaying a curved stroke, one upon another. Wavy lines give a hem for the gown. Straight strokes decorate the gown and form “feathers” on the wings. A bow joins the head to the body.
ALSO SEE: Early American weathervanes: 60+ examples of old-fashioned decorative & functional rooftop art

Panel No. 10 — You don’t have to be an architect to design this house. It’s very simple; typical of folk decorations…
If you have practiced all the foregoing primary designs, you are off to a good start! But don’t stop here. Use these designs in combination for forming an all-over decorative pattern.
Make up some designs for yourself. Your Transformagic will be more fun — you will find greater satisfaction — if your work represents you.
Diagram panels 6 through 10 (from above)

How to complete the decorations for folk-art painted furniture
The final step is making a complete decoration by harmoniously combining the primary designs — the hearts, flowers, vegetables, human figures, etc. — one with another.

Before you start, decide in a general way what kind of decoration will be most suited to the type of piece you are transforming.
Primary designs should be in keeping with not only the character of the piece, but also the room in which you plan to use it.
For example, you may not want to decorate a piece for a den or basement playroom with carrots or other vegetable designs. These motifs are better suited for the dining nook or kitchen.
MORE: Vintage 1940s wallpaper: 150 real samples of popular old patterns & colors

Guide lines
On your first transformation, it may be helpful to sketch in the decoration roughly with pencil before you apply the colors.
Notice that we said roughly. Use these pencil lines to locate the position and size of the various designs, but don’t draw each primary design in detail.
Some beginners have made this mistake and found that, when they painted on the color, they could not help following the pencil lines in a slavish manner. These designs never seem to capture the freshness and simplicity you are trying for.
DON’T MISS THIS: Post-war housing: See 35 small starter homes from the ’40s & ’50s

Proportion
Proportion is something you should think about before you go ahead with decorating. We mean by “proportion” the interrelationship of the size of the primary designs to the decoration as a whole… and the size of the complete decoration to the section of the piece you are decorating.
It is not as complicated as it sounds, but it is important.
First, don’t handicap yourself unnecessarily when you think about proportion. You are creating “folk art,” so there are definite liberties you can take. For one thing, the primary designs should not be in proportion to one another.
Suppose you decide to use, as parts of your decoration, primary designs of a man, a woman, and a bunch of grapes. You can paint the grape cluster almost as large as — or even larger than — the figures.
Such disregard of the normal relationship between the size of objects makes your decoration sing with the quaint humor and charm of this kind of expression.

On the other hand, there is a rule of normal proportion you should always follow. Keep the area of the complete decoration in proportion to the panel or section of the piece you are working upon.
Working too small seems to be a tendency of some beginners. Not until they have completed the decoration do they realize that the decorated area is “lost” in the expanse of the background.
The best way to avoid this is to step back from the piece so you can critically determine how large or small your decoration will be. When you make guide lines, keep this in mind.

Color
Select the colors before you start. Typical decorations are made by using four of the bright colors shown on the DUCO color card. However, equally exciting results can be obtained using only one color for the decoration.
What you do is select the color you prefer and add varying amounts of White. Four distinct tints are made of the same shade. These tints are used in exactly the same manner you would use four separate colors.
* Note about the use of turpentine, mineral spirits or other solvents: Only use the correct type of fluid for the type of paint in question, and in particular, do not use solvents with acrylic paints. Talk to someone knowledgeable at your local hardware or paint store for tips and advice when painting or refinishing paintwork.
NOW SEE THIS: Folk-art painted furniture: Upcycle & renew furniture with tips from famed vintage artist Peter Hunt


