

The basic structure is deceptively simple: Start with a chain of six joined into a ring, then build outward round by round, working clusters of double crochet stitches into the corners. Five rounds make the classic square. From there, the only limit is how much yarn you have — and in the 1970s, the answer to that was usually: plenty, including whatever was left over from the last project. Granny squares were one of the most efficient ways to use up remnant yarn, which gave the craft a practical edge beyond its visual appeal.
What made the granny square so popular in the ’70s was its range. As one 1974 feature put it, the squares were “big news” — turning up in rugs, tablecloths, afghans and lampshades, but also in wearable fashion. Sweaters, skirts, ponchos, stoles and handbags all got the granny treatment.

Designers figured out how to combine squares of different sizes and stitch variations to shape garments around the body, filling gaps with single crochet and playing with color placement to create entirely different large-scale patterns from the same basic unit. As the original guide noted, “in granny-squaring, the whole is greater than the sum of its parts.”
Color was where crocheters really got to make the work their own. Earth tones dominated a lot of 1970s projects, but there were also bright pinks, multicolor mosaics and black-and-white combinations with strategic color accents. The arrangement of completed squares in a finished piece could produce an entirely separate secondary pattern — so two people working from the same instructions could end up with very different-looking results just based on their color choices.
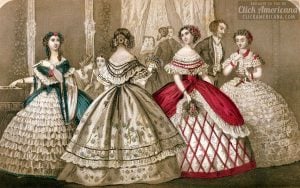
We’ve gathered original photos and editorial spreads from a 1974 magazine feature to show you what granny square projects actually looked like at the height of the craze — from classic home textiles to some of the more ambitious wearable designs that pushed the format well beyond grandma’s armchair.

Granny squares: Fun! Quick! Easy! Carry wherever you go! (1974)
Nobody knows who the first Granny was, but she sure has provided a lot of fun for women who crochet. These squares are easy to do and multiply so fast, you can turn out an afghan before you can say “Grandpa.” And since you do them a square at a time, you can carry them anywhere.
Granny Squares are big news today, not only in rugs, tablecloths, afghans and lampshades for the home, but also in the brightest, most colorful fashions you can wear. The accessories for your home are the traditional Granny Squares, all done with one pattern.
You can work with many yarns, including leftovers, and be as versatile as you like simply by varying the number of squares, the colors, yarns and the gauge. The squares for the fashions — where clothes are shaped to fit the body — are adaptations and are used for sweaters, skirts, dresses and hats as well as for scarves, handbags and stoles.


The joy of granny-squaring
A gallery of gallant, gorgeous, gleeful things that you make with the versatile granny square — that small portable crochet unit that uses up leftover yarns, multiplies as fast as your fingers can fly, adapts itself to clothing and other worldly goods, and never seems to run out of creative variations.
Pluperfect Poncho: 12 traditional granny squares, each a big ten and a half inches, make this lacy poncho. In DMC pearl cotton.

The traditional Granny square and how it grows
The glories of the granny square explained, elucidated, exemplified, interpreted and illustrated • Complete directions for all the granny square things in this issue
Starting at center with first color, ch 6. Join with sl st to form ring.
1ST RND Ch 3, work 2 dc in ring, (ch 1, work 3-dc shell in ring) 3 times, ch 1; join with sl st to top of ch-3. Break off,
2ND RND Make 1p on hook with 2nd color, y o and insert hook in any ch-1 sp, draw up 1p and complete dc; in same sp work 2 more dc, ch 1 and 3 dc for first corner, * ch 1, in next sp work 3 dc, ch 1 and 3 de (another corner). Repeat from * twice more. ch 1; join, Break off.
3RD RND Make 1p on hook with 3rd color, y o. work first corner in any corner sp, ch 1, 3-dc shell in next sp, oh 1, work corner in next corner sp. Repeat from twice more: ch 1. shell in next sp. oh 1; join Break off.
4TH RND Make 1p on hook with 4th color, y o, work first corner in any corner sp, * (ch 1, shell in next sp) twice; ch 1, work corner in next corner sp. Repeat from * twice more; (ch 1, shell in next sp) twice, ch 1; join. Break off.
5TH RND Make 1p on hook with 5th color, y 0, work first corner in any corner sp, ch 1, shell in next sp. Repeat from * to next corner; ch 1, work corner in next corner sp. Continue around in pattern; join. Break off. Repeat last rnd in any color for desired size.
Tender tunic, a pride of pillows, eternal triangle shawl, dream of a bedspread, child’s mosaic sweater
Tender Tunic (right) Unusually delicate granny squares form the front and back panels and elbow insets this romantic four-color tunic. The rest is lacy cluster stitch. D.M.C. pearl cotton. Designer: Linda Osborne Blood.
A Pride of Pillows (center, top) Two lacy concoctions and a fascinating sculptured-effect granny are used over linen-covered pillows. Peach Pillow is 14-1/4″ square, made of nine 4-1/4″ grannies. Taupe Pillow is 14″ square, made of four 51/2″ grannies. Both in D.M.C. pearl cotton worked double. Designer: Nan Brown.
Multicolor Pillow is 12″ square, made of four 6″ grannies. In Kentucky All Purpose (rayon) Yarn. Designer: Shanie Jacobs.
Eternal Triangle Shawl (center) A pretty, flowing cover-up made of triangular grannies with 71/2″ sides. The bright pink edges of the small triangles form stars and hexagons in the overall design; crocheted rosettes embellish the intersections. Bear Brand 3oufflO acrylic and vinyon yarn. Designer: Erika Loeb.
Dream-of-a-Bedspread (right) Black and white stroked with color here and there make a sensationally sophisticated throw. It’s composed mostly of 10″ traditional grannies with some sections made of four 5″ grannies and measures 80″ x 120″. Bear Brand Winsom Orlon acrylic yarn. Designer: Ellen Fine.
Child’s Mosaic Sweater (far right) Marvelous things happen when you combine grannies of different sizes and colors with pretty striped crochet areas. Gusseting on both sides eases the fit. Striped sleeves are single crochet. Bernat Berella Orlon acrylic yarn. Designer: Risa Barber.

Comely cardigan and scarf set, surefooted slipper, peripatetic pouch bag, patchwork pillow, putting-on-the-dog coat
Comely Cardigan-and-Scarf Set (far left) Very unusual 8″ squares done in rich earth colors with faint echos of bargello give special elegance to this sweater and scarf duo. Single crochet and chain-stitch borders. Bear Brand Winsom Orlon acrylic yarn. Designer: Erika Loeb.
Surefooted Slipper (center, top) Six traditional granny squares make each upper, the soles are single crochet. Drawstring through eyelet-crocheted top edging keeps them snugly on. Designer: Erika Loeb.
Peripatetic Pouch Bag (center) A wanderer’s delight, eager to hold anything you need to take with you. Made of five 12″ traditional grannies. The double straps have wide reinforced shoulder sections. American Thread’s Orlon acrylic sport yarn and Aunt Lydia’s Heavy Rug Yarn. Designer: Helen Swanson Preston.
Patchwork Pullover (above, left) Marvelous assemblage of traditional grannies in different sizes, cleverly placed and spaced with single crochet stripes so they fit to a T, front and back. Single crochet also makes the sleeves and side gussets for an easy fit. Bear Brand Winsom Orlon acrylic yarn. Designer: Risa Barber.
Putting-on-the-Dog Coat (left) How to pamper your favorite pet when cool winds blow . . . our dapper doggy turtleneck sweater-coat, of tiny 3″ squares, buttons on under tummy. Bear Brand Winsom Orlon acrylic yarn. Designer: Lynn Sherman.


Some special tips on granny squaring
DEFINING THE GRANNY SQUARE
A granny square is a small crochet unit with a geometric shape. It starts, as shown, with a chain of about six, joined to make a ring. Working into the ring, you make the first round, then the second and so on.
Five rounds make the traditional granny. In the classic square, groups of double crochet stitches for a shell, chain stitches separate the shells and make the corners. You can join granny square units to make any number of wonderful things.
SOME SPECIAL TIPS ON GRANNY-SQUARING
A granny square is a small crochet unit with a geometric shape. It starts, as shown, with a chain of about six, joined to make a ring. Working into the ring, you make the first round, then the second and so on.
Five rounds make the traditional granny, in the classic square, groups of double-crochet stitches form a shell, chain stitches separate the shells and make the corners. You can join granny-square units to make any number of wonderful things.
No products found.
VARIATIONS ON A THEME
Nowadays crocheters feel free to experiment and often introduce a variety of interesting stitches into their rounds, thus creating unique designs of their very own. Inventing your own granny is great fun.
Because the unit is small you never have far to go to correct a mistake, and when working out your own design, it’s only a matter of minutes to rip out a round and develop a new round composed of different stitches. You need not even be confined by the idea of producing a square. As you see, we used a hexagon for the center unit of the Head-turning Beret shown on the cover and triangles for the Eternal Triangle Shawl.
VISUAL EFFECTS
You can do all sorts of things with the granny to achieve different looks, such as .switching hook sizes from one round to the next or mixing together different yarns and textures. However, color is probably the most dynamic design component of a granny-square project.
The overall effect of a finished sweater or afghan owes as much to the magic of color as to the clever arrangement of crochet stitches (so don’t worry if you never get beyond the traditional granny, you can still be a sensational granny squarer).
In choosing a color scheme for your individual squares, you can put together marvelous combinations. In addition, placement of the individual units in the finished project may be done in such a way as to produce still another larger de-sign motif. In granny-squaring, the whole is greater than the sum of its parts.
PUTTING YOUR GRANNIES TOGETHER
Individual granny squares are of course joined together to create a finished project. They are like building blocks, and, like blocks, should all be the same size (or multiples of each other) if they are to fit together perfectly.
For example, in combining different size squares, suppose your largest square is 9″; three 3″ squares or two 4-1/2″ squares could then be placed next to it and fit. Two 4″ squares would fall 1″ short; two 5″ squares would be 1″ too long. (See Drawing 1.)
We’ve done a number of things, the Child’s Mosaic Sweater for one, that bypass this problem by filling in extra spaces with single crochet. If you crochet tightly one day and loosely the next, your squares may vary as much as half an inch across.
Check as your squares accumulate to make sure you are keeping them the correct size. If a granny you are working on looks as though it’s going to be too big (hold it against a finished one of the correct size or measure it). start crocheting with a bit more tension on the subsequent rounds. If you seem to be working too tightly and will end up with a too-small square, loosen up on the last rounds.
MAKING GRANNY-SQUARE CLOTHES FIT
Clothes made from granny squares can be full of grace and beauty, but only if you take a few necessary steps to make them fit properly. Relying on the building block technique alone won’t do when the garment must conform to the natural curves of the human body. (Remember that granny squares when joined produce a flat piece of material that does not lend itself to darts or the other fitting devices used when sewing.)
Here are some easy techniques for getting granny square clothes to curve nicely around your figure.
Altering Granny Squares
In areas of a garment where you need more fullness or snugness you may substitute an enlarged or reduced granny for the usual square. This is not difficult. To enlarge your square use a taller stitch (a double crochet is longer than a half double crochet), a larger hook or a thicker material on one or more rounds of the granny.
To reduce the size of the square use a shorter stitch, a smaller hook or thinner mate-rials on one or more rounds. You can ease in or block out the edges of adjoining squares to match. the reduced or enlarged granny. Other fitting problems may require a tapering effect (such as would be achieved by a dart).
To produce a tapered granny, use one hook on half of each round, a smaller size hook on the other half of each round; you will produce a “square” that looks like Drawing 2.
Filling in between Grannies
Another way to design fitted garments is to combine grannies with regular crochet, the regular crochet being worked into crucial areas that require shaping and fit. Basically, what you are doing is interrupting the straight look created by the squares, and curving the lines. Compare the items in Drawing 3.
Finding the Critical Measurement
Some garments don’t require precise sizing and shaping but have one critical area that mustn’t be too tight or too loose. A sweater is a good example; here the bustline must be correctly fitted.
You may have decided you want your sweater to be eight grannies around (four across the front, four across the back). Divide your bust measurement by eight to get the correct granny square size, (For a 32″ bust, the correct size of each of the eight squares would be 4″.) Should you prefer a clingy sweater, make each square 1/2″ smaller; 1/2″ is a reliable “stretch” allowance for most grannies and your sweater should fit.
No products found.
JOINING GRANNY SQUARES Granny squares can be either sewed or crocheted together. To sew grannies together, use a blunt yarn needle, work from the wrong side, butt the edges together, and use either of the following techniques:
(1) Weave yarn back and forth from edge to edge (see Drawing 4).
(2) Use a whipstitch (see Drawing 5). If you want the joining to be almost invisible use matching yarn. Yarn of a contrasting color, however, can produce an interesting effect. To crochet squares together, use a slip-stitch or single crochet (see Drawing 6).
If you like the look of a ridge around each square, work the single crochet joining on the right side; this can be very attractive when done in a contrasting color. You may give your finished pieces an entirely new look if you use one of the fancier joining techniques involving a lacy network of stitches or rows of double crochet.
These pretty joinings are also an effective way to sneak in a little needed extra width or length to a garment’s overall size. An interesting edging is another way to provide just the right finishing touch you need on your granny-square project. As with joining techniques, edgings may be tailored, understated borders or elaborately lively fillips to the completed work.

Crochet granny squares today!
No products found.


One Response
I just finished a granny square cardigan with short sleeves.
I made vests and afghans since my teen years.
It’s good to learn a take along craft to keep your hands and mind entertained.