Before store-bought wrapping paper became standard in the early 20th century, people used what they had — newspaper, brown paper, cloth — anything that could cover a box. Once decorative paper hit the shelves, though, presentation took off. By the mid-century years, wrapping gifts had become its own seasonal tradition, complete with magazine spreads showing readers how to fold, fluff and tape their way to a picture-perfect package.

That’s exactly what Family Circle offered in 1964: A guide to making tissue paper poufs using simple folds like the butterfly, fan, and petal roll. With these techniques, you could stack and shape tissue into layered decorations that sat on top of wrapped gifts like flowers or bows. The finished look was bright and sculptural, and the process wasn’t hard — it just took a little time and a steady hand with some tape.
The great thing about this style of gift wrap is how flexible it is. Whether it’s a holiday, birthday, or just a fun surprise, tissue poufs work for gifts of all shapes and sizes. You can use full sheets for a big box or snip small petals for something delicate. It’s an easy way to make a present feel a little more thoughtful without needing anything fancy.
Below, we’ve gathered the photos and instructions from the original 1964 article so you can see how it was done back then. Whether you follow it step by step or use it as a jumping-off point for your own version, these vintage ideas show how much a little extra effort can do.
No products found.
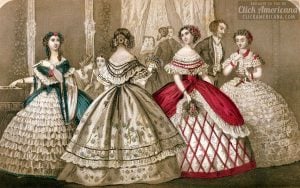
DIY gift wrap with tissue-paper pouf wraps (from 1964)
Aren’t they fabulous — our pouf-wrapped gifts? We’ve never seen a more exciting gift-wrap idea, or a more impressive one.
Brilliant tissue paper in generous amounts is the magic ingredient, with wide satin and velvet ribbon added for trim. Of course, you may not want to pouf-wrap all your presents (for it takes a little time), but why not surprise such a few special people with these “just too pretty to open” packages? We tell you how, and — nice note — it’s not at all hard.
Want to wrap gifts with tissue paper? Here’s how to make the gift-box decorations shown
In making the tissue-paper poufs pictured, three techniques are used: The butterfly fold, the fan fold, and the petal roll. After making a few poufs with these basic folds, you can easily copy our ideas — and go on to designs of your own for gifts of any size and shape.

WRAP GIFTS WITH TISSUE PAPER: GENERAL DIRECTIONS
BUTTERFLY FOLD: This is made by gathering a strip of tissue in the middle (FIG. 1a). When tightly gathered, tape or tie around middle to secure (FIG. 1b). The taped pouf will have a butterfly shape.
FAN FOLD: Make a butterfly fold, but instead of taping or tying it, fold in half and tape the fold to secure (FIG. 2). The taped pout will have a fan shape.
PETAL ROLL: To make either a round or tapering, petal shape, always cut 2 thicknesses of tissue and use the 2 layers together in making a single petal. Place the petal tip on a pencil and roll petal part way (FIG. 3a) around the pencil, then push tissue from each side — toward the middle (FIG. 3b) — until it is crushed tightly. Remove pencil and fluff petal.
HELPFUL TIPS: You can easily make multiple strips by spreading out all or part of the package of tissue and cutting it in fourths, thirds, or whatever strip-width you desire. Half or whole tissue sheets may be used for extremely large boxes.
Petals for some of the designs are pinch-pleated at blunt end and can be stapled or taped to hold pleat, or taped directly to the box, depending on the way they are used in the design. Always fluff tissue after completing pouf; it will hold the pretty shape into which you mold it.
Our directions below give dimensions of the tissue strips or petals we used on gift boxes in the variety of sizes shown — as a general guide to making poufs of pleasing proportions.

WRAP GIFTS WITH TISSUE PAPER: SPECIFIC DIRECTIONS
ORANGE POUF (on orange box)
From double tissue,cut 7 petal shapes 6-1/2″x2″, and petal-roll (see General Directions, above). Pleat ends and tape petals upright to top of the tissue-wrapped box. Cut eight 4″ tissue squares: butterfly-fold each (see General Directions, above), tape pairs together, then tape to box top around base of petals. Complete with ribbon looped into rosette with streamers; tape rosette to box top at one corner.
ROSE-AND-RED POUF (on tall rose box)
Cut 6-1/2″x 10″ tissue strips, 12 rose and 12 red. Fan-fold (see General Directions, above) in pairs, and tape to top of box, alternating colors. Tape pink and red ribbon streamers of varying lengths to one corner of box.
TWO-SHADES-OF-BLUE POUF (on large blue box)
Fan-fold whole tissue sheets (see General Directions, above)- 6 light blue, 6 royal blue. Tape to box top at even intervals, to cover. Fluff up middle of pouf: fluff tissue around edges down over lid of box.
TWO-TONES-OF-GREEN POUF (on blue box)
Cut tissue sheets in fourths for 7-1/2″ x 20″ strips — 20 light green and 20 moss green. Butterfly-fold each strip (see General Directions), taping a light and dark green strip together, then tape pairs to box in 2 close-together rows across middle of box-top length. Make a rosette of green satin ribbon with 6 or 8 varilength streamers. Tape to box at one end of pouf rows.
YELLOW-AND-GREEN POUF (on yellow-wrapped bottle-shape gift)
When wrapping a bottle-shape gift, allow 3″ excess tissue at top, then gather and tie tightly at bottle top with 24″ ribbon, allowing 12″ ribbon ends. Cut 6″ tissue squares, 10 yellow and 10 green.
Butterfly-fold in pairs (see General Directions), but instead of taping, tie each pair with the ribbon, close to bottle top and circling it, alternating colors. (Excess tissue left on gift-wrap at top will form center of the pout.) Trim ribbon ends after tying in the last butterfly fold. Decorate gift below pouf with ribbon and streamers as shown.
ROSE CONE-TREE POUF (on rose gift box)
Make a cardboard cone, and tape to secure (ours is 18″ high, with a 6″ diameter at base). For lower half of tree, cut petal shapes 5″ long and 2-1/2″ wide; for upper half, make petals 1″ shorter and 1/2″ narrower. Petal-roll each double-thickness petal (see General Directions, above).
Begin taping petals around base of cone, curled ends down; then circle cone with a second row that overlaps first. Continue until cone is covered. Over tape at tip, pin a green ribbon tailored bow, and add more bows at pleasing intervals. When complete, tape cone base (underneath last row of petals) to box top in several places to secure.

RED-AND-ROSE POUF (on shallow rose box)
Cut 7-1/2″x 11″ tissue strips, about 12 each of rose and red for each flower shape. Butterfly-fold (see General Directions) and tie pairs together in a series, alternating colors. Tape to gift box decorated with velvet ribbon as shown.
GREEN-AND-BLUE POUF (on green gift box)
Cut 2″ x 4-1/2″ petals from blue and green tissue, in equal numbers. Petal-roll (see General Directions, above), then tape to 1/3 of box top. with curled ends forward, alternating colors and overlapping layers. Repeat, beginning at other end of box, with curled ends forward, till box is covered; tie green ribbon with bow around box where petals meet, as shown in photo.
GREEN POUF (on green box with red and green ribbon)
Cut 4-1/2″x- 30″ tissue strips (we used 12). Butterfly-fold (see General Directions, above) and tape to one long edge of box. Add red and green ribbon with tailored bow, as shown.
ROSE-AND-RED-FLOWER POUF (on rose hat-box)
Cut circles of varying diameters-from 11″ to 15″ in each color. Petal-roll (see General Directions, above) on a 3/4″ dowel or curtain rod. Gather about 1/4 of circle area that is opposite petal roll; secure with tape.
Secure petal bases to middle of box top with tape, beginning with largest petals; graduate sizes and alternate colors as you layer the petals, with smallest petals placed at top of flower. For petals near top, use wire instead of tape if needed to secure. Roll top petals up to form bud shape (see photo) and fluff lower petals down over box lid.
GREEN-AND-YELLOW POUF (on yellow box)
As a base for the decoration, use wadded newspaper covered with tissue. or half a polystyrene-foam ball. For top, cut 7-1/2″x6-1/2″ green strips (we used 12); for middle row, cut same-size yellow strips (about 24) ; and for lower row, cut 6-1/2″ x 15″ green strips (about 36).
Butterfly-fold (see General Directions, above) strips for top singly and strips for lower rows in pairs. Tape pout rows to ball base, beginning with bottom row. Fluff tissue to cover tape. Tape ball base to box top.
TWO-TONES-OF-GREEN POUF (on green box)
Cut petal shapes 5-1/2″ long and 3″ wide-10 or 12 from each shade of green. Petal-roll (see General Directions, above), combining the two shades of green in some of the petals. Pleat blunt ends and tape around top center of box (to which ribbon and streamers have been affixed), layering petals and grouping or alternating green shades. Fluff for pleasing open-flower effect (see photo).
No products found.